FREEDOMFI OUTDOOR METRO CELL

Setup FreedomFi Outdoor Metro Cell

Plug-and-Play Setup Guide

Prerequisites: This guide assumes that your FreedomFi gateway is already set up and is running. FreedomFi gateway software is updated to 1.11.4 or later.

Initial Connectivity Setup
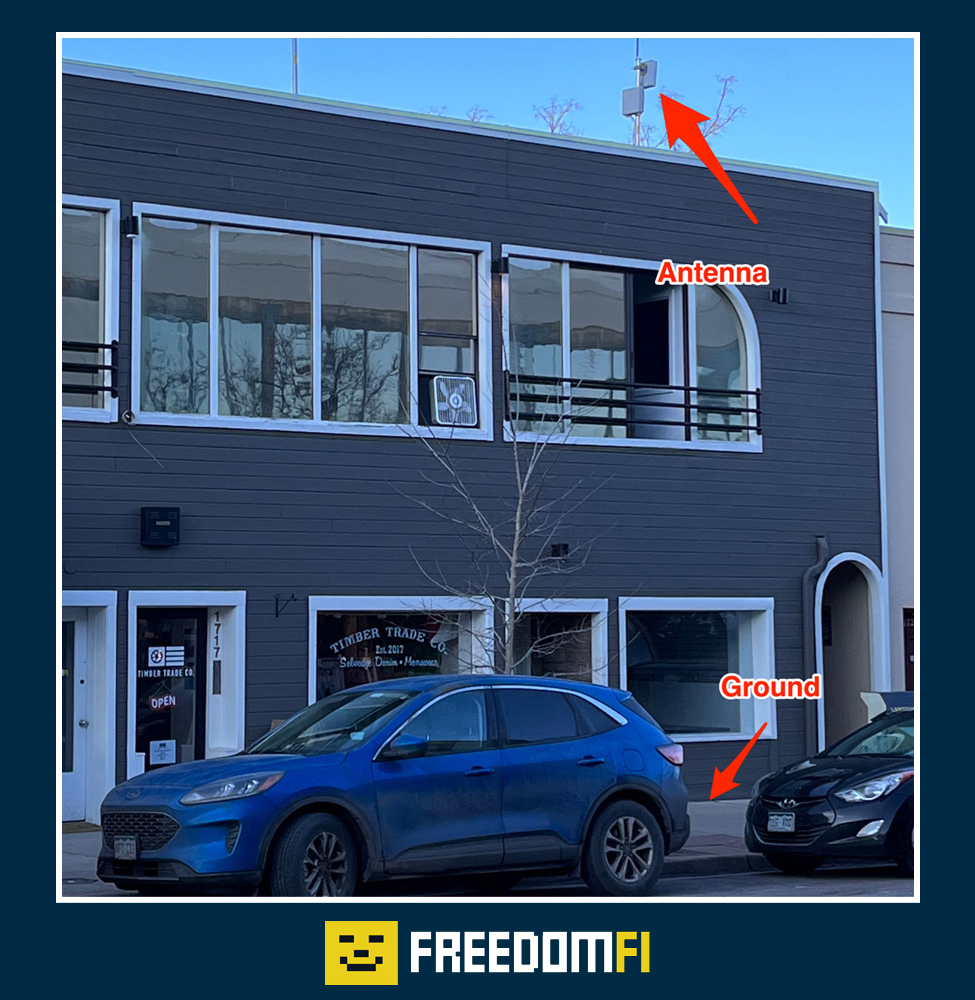
To start, we will be placing the Outdoor metro cell inside near a window and next to your network gear to confirm a set of preliminary checks. This validates that things are working before the outdoor metro cell is deployed to its permanent location where it may be difficult to access.
Step 1 – Connect Power Terminal
Connect the power terminal to the positive and negative leads coming from your power supply. The colors may differ depending on your shipment, look at the label on the power supply to determine + and – wires. Connect per the guide image below.
Step 2 – Open the weather door to expose power and ethernet ports
Open the weather sealed door using an allen wrench to expose the power and ethernet connections for the radio.
Step 3 – Connect Power and Ethernet cables to the Radio
Connect an outdoor rated ethernet cable to the port labeled “DATA/MGMT ETH”. Connect the Power Terminal to the power port. Screws on the power terminal should be facing the inside of the compartment. Depending on the location of your nearest power outlet, you may need to extend the power cables. The length of this cable should be long enough to reach the permanent location where you want to deploy the metro cell. Ethernet cables may be up to 100m/330ft.
Here is an example: Outdoor Rated Cable

WARNING! If your outlet for your radio is outdoors, ensure the power adaptor for the radio is placed inside of a waterproof enclosure. If your outlet is indoors, ensure that no water is able to travel along the wires and make its way inside. Water damage due to improper installation is not covered under warranty.

Step 4 – Connect the Ethernet cable to the Gateway
Connect the other end of the ethernet cable to the port labeled eNB1 the FreedomFi Gateway. Two additional CBRS small cells are supported on the eNB2 and eNB3 ports.
For now, don’t worry about the location of the outdoor metro cell. We will be moving the outdoor metro cell to a permanent location at a later point, but we want to connect the cable inside to make sure things are working.
Step 5 – Verify Connectivity status
Visit the metro cell dashboard using:http://freedomfi-gateway.local If all goes well, you should see the following in the metro cell dashboard. Spectrum Status will be “trying” and On Air will be OFF until the metro cell registration is submitted and approved.
Outdoor Metro Cell Install and Registration
Location Selection
To start, make sure you select a good place for the Outdoor metro cell. Obstructions will decrease coverage. CBRS signals have less range than LoRa. Similar to Wi-Fi they can be weakened or blocked by obstacles like walls, trees, and buildings. To capture the most data you can, you want your metro cell to point towards a populated area, a place with a lot of people and phones e.g. a park, a playground, an outdoor cafe/coffee shop.
For purpose of improved coverage area, it is recommended to mount your outdoor small metro as high up as reasonably possible. This often means on a roof, or near the roof line of a building. Roof mounting examples for a home or metro business:

Requirements: The outdoor metro cell will require installation CPI approval before it can go on air and allow users to connect. The CPI process requires the following:

NOTE: How to get and submit this information along with sample photos will be covered in the metro cell registration section below.

Metro Cell Registration
To enable the outdoor metro cell, you’ll need to complete the CPI flow and get approval. The process starts with registering the metro cell location.
To register the outdoor metro cell, you’ll need the following information along with photos to prove it.
Step 6 – Recording Height
You will be required to submit the height of the installation and a photo to verify it. Here are some ideas on how to get the height:
Take a photo that shows the radio and the ground. Sample Verification photo:
Step 7 – Recording Azimuth Angle
Azimuth is a fancy name for the compass direction in which the center of the antenna is pointing. Please utilize the free NOAA Mobile Magnetic Declination calculator for this measurement.
Steps to collect this photo:
The sample picture is showing azimuth angle of 176 degrees.
Caution Notes:
Step 8 – Recording Elevation Angle
The elevation angle is a fancy name for “is it pointing up or down from level.” The reference point is the middle of the antenna. To ensure consistency across all applications, we ask that you please utilize the following free app to measure & record your elevation accurately.
Bubble Level
Steps to collect this photo:
The sample image is showing 3 degrees of down-tilt angle using the Bubble Level app.
Caution Notes:
Step 9 – Capture the Antenna Product Badge Photo
To verify the antenna model used, take a picture of the product badge on the unit. This should show the manufacturer and model number. Example photos below.
Step 10 –Capture the overall Antenna photo
To verify the antenna installation, take a picture of the overall antenna in it’s mounted location. Example photos below.
Step 11 –Register Metro Cell
Now that you have the metro cell information and photos, you will need to submit them for CPI approval.Access the metro cell dashboard by pointing your web browser to http://freedomfi-gateway.local from a device on the same network as the FreedomFi Gateway.
You will be notified by email with the status of your submission within 3 business days.
Step 12 –Verify metro cell is Online
Once you get the CPI approval notification, your metro cell should be ready to go. To check, navigate to the Radio Dashboard and verify that the registration status is approved, and the statuses are all Green.

Stuck? 

Appendix - Troubleshooting Metro Cell Status
To access the local dashboard, point your web browser to http://freedomfi-gateway.local from a device on the same network as the FreedomFi Gateway. Click on Radio Dashboard.
Did you make a $100 waitlist reservation in the past? Please check below to redeem your waitlist code for a discount.

Waitlist Status

Subscribe Now

Subscribe Now (Helium5G)

Please subscribe below to learn about future announcements related to FreedomFi Gateway release.